VOLVO C303 | GALLERY |FORUMS |ABOUT-ME | Home Page ]
![]()
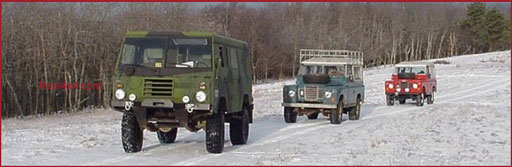
The first venture in it's new land. Pictured here in the Appalachian mountains of SW Virginia, USA.
![]()
About 1.5 months later, I had it come in to the US through my usual channels. With help from a friend of mine, Stuart Moore, we drove out to the docks to pick this one up in person. My trucks always come delivered to my shop by an 18 wheeler but I had to do this one differently (very cheaply) since it was to be my own show truck and not for resale. Stuart's F-350 SD pulled us and my "new" C303 back to his place in Richmond Va. From there, it was prepped and tagged for driving back home to Roanoke.
The 3 hour trip home was great. I didn't even care that it was raining the whole time, or that the old military tires were worn out and very loud... I was driving my ultimate 4x4 home!

Here's how I found it, at it's temporary home in the UK... waiting on me to come and pick it up of course!
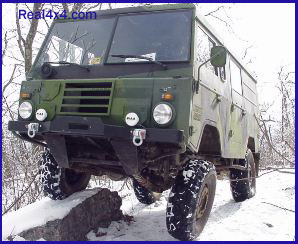
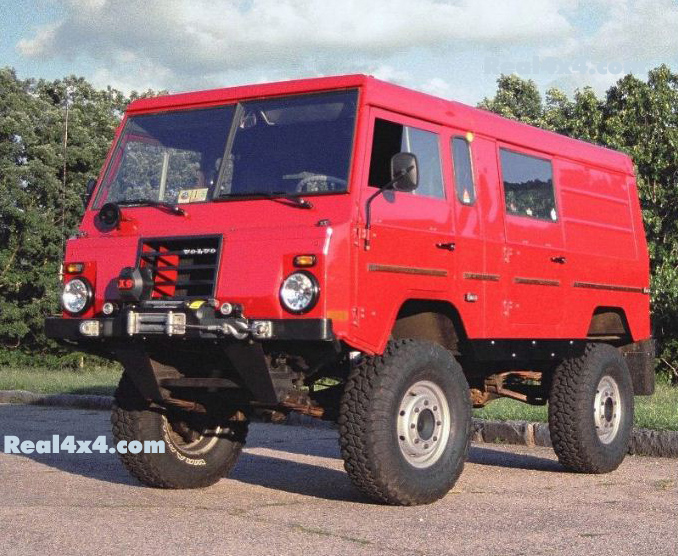
Some off-road testing was in order before any heavy work would begin. The future winch bumper seen here too.
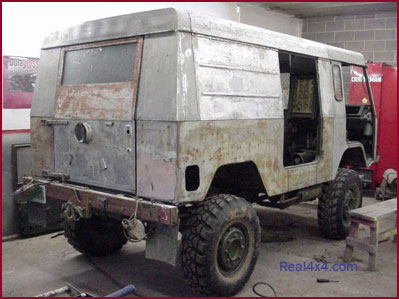
Several months later - April '03: Finally getting sanded and COMPLETELY stripped of the old, horrible looking military paint. 3 to 4 days were spent stripping the paint chemically, by myself. The roof was taken over by the painter (I was worn out!). There must have been five layers of that damn paint. Luckly, underneath it all was a new zinc-plated body, free of rust, with only a few small dents. The hole in the right rear fender is for a new custom fuel filler kit. The stock filler is horrible and mostly useless, so I came up with a better solution!
--
May 10, 2003- The new (red) paint job was finally finished. I'll put up the full pictures after everything else is put on. In the mean time, I'll post pictures of work as it is completed.
--
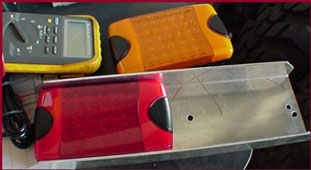
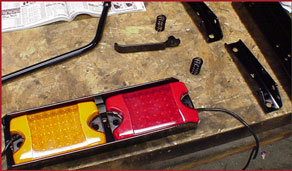
This is the latest in LED signal lights, all the way from New Zealand! I thought up this simple aluminum light guard which will be powder-coated in black. These are multivolt units which can operate from 9 to 30 volts at the same brightness. They are fully US road legal and should never burn out. They are also safer for me and others since they increase brake response time with an almost instant-on feature that is inherent with LED's. (And they are VERY bright)
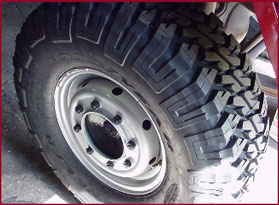
May 12, 2003- Fully sand-blasted and repainted wheels were installed. I enjoy painting parts like wheels myself. It requires special attention that some body-shop painters don't understand. I always let them handle the body, not the parts. New 35-12.50-16 tires were mounted and there is right at 16" (406 mm) of under diff. ground clearance! (I traded someone a spare portal axle for the new tires!) Hubs and lugs were all stripped and painted too. It's amazing how just finishing your wheels and tires correctly can completely change the look and comfort of your machine. These MT/R GoodYear tires are 10 times the tire that the C303's usually come with. The ride, handling, stability and noise levels were all vastly improved.

Installing the new Free-Form reflector type headlights. They use a Hella H-4 24v hal. bulb. I think these helped update the look of the C303 by 20 years or so. The beam pattern is excellent!
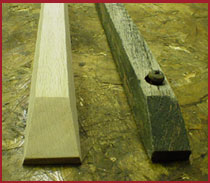
The old wooden rails were in great need of replacement. A specialty cabinet shop built these new ones out of Oak. They will be stained in dark brown. I preferred they be made like this instead of the old skinny and straight cut design of the stock wood. This wider base allows more surface area to disperse pressure on the body in case of rubbing and the more angled cuts update the look. The side of the roof will also get rails for top-side protection against trees when leaning.
May 25th: The rear door hinges, tail-light guards, etc. are back from the powder-coaters.
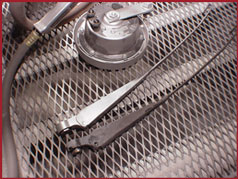
The horn and wipers can be seen here. This is before and after sand-blasting. This process is quite necessary for proper refinishing, whether that be powder coating, or painting.
June 1: The original emblem is finally surfacing. It was covered with layers of old green paint. Careful stripping is revealing this very new looking item! (Fits on front grill)
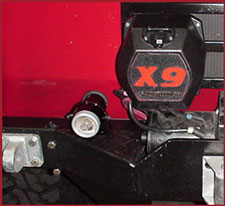
June 11: Finally getting the winch and bumper all bolted in. The new 24v Micro DE Hella fog lights are also getting aligned. The Superwinch is my personal favorite make of winch (next to the Goodwinch, which are way too expensive for me right now). The SW are British built units and are known for their tough motors. I have used an X-9 model on my old Land Rover for about 7 years with NO problems. This X-9 24v version is one that I had in storage, once used on my ex-1972 Pinzgauer that I owned a couple of years ago. It was used only once... to pull someone else up a rocky hill!
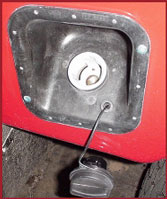
Here's the new fuel filler solution getting all screwed down. This is 100000 times better than the stock filler which actually leaked petrol when the 303 would lean to the side or back.
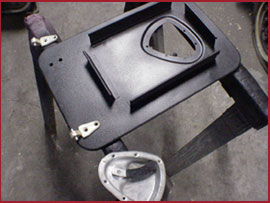
June 10: This is the engine access hatch which sits inbetween the front seats. It was sand-blasted and repainted with a bed-liner spray. New heat reflective insulation was also added to the back. Even the brass hinges were green... I had no idea how nice they'd look after a little blasting.

June 23, The exterior is finally done! (90% done anyway) Don't look directly into that HID flood light! The inside is next, which is the hard part. Like my "License Tag"? ;)
(Updated pic 8/04) Just finished up installing the new 1/4" steel rock guards.
Plans and upgrades for this C303 include: The latest in HID flood and LED int./ext. lighting technology, new GoodYear MT/R tires, modern shocks, custom rock sliders, softer rear springs, custom muffler, custom wood rub-rails, complete painting of inside and outside, 24v-120v 1000watt Inverter, yellow Optima batteries, full sound insulation/carpet, electric cooling fan conversion for the motor, electronic ignition with updated wires and plugs, complete stereo and inside trim upgrades, a new time-programmable Espar heating system, color back-up camera with 7" LCD screen (also for DVD), new or recovered (non-green) seats, custom made winch bumper with 24v Superwinch X-9, and heavy duty recovery points front and rear. - All completed as I can afford to do it!
MORE TO COME
![]()
VOLVO C303 | GALLERY |FORUMS |ABOUT-ME | Home Page ]
Started in May 2003
This page was designed by Vince Sweeney.
Copyright © 1999-2008 (Including images) - All rights reserved.